Introduction
In modern software development, managing artifacts and dependencies efficiently is crucial for maintaining a smooth and reliable build process. Nexus Repository Manager, developed by Sonatype, is a powerful tool designed to address these needs. This blog will provide an in-depth guide to Nexus, covering its setup, configuration, and best practices for managing your artifacts.
What is Nexus?
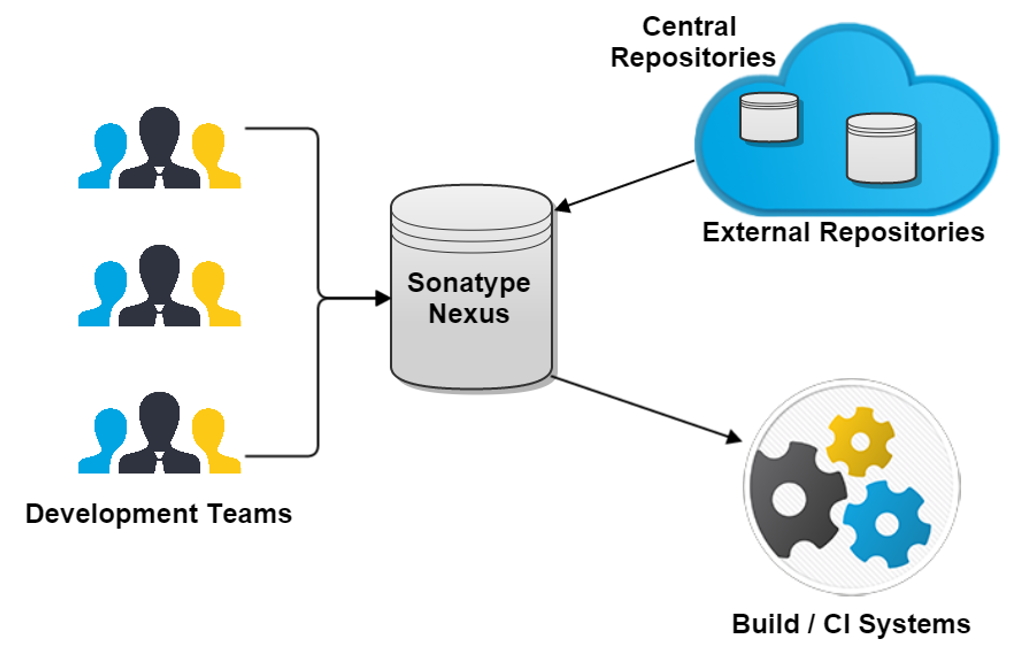
Nexus is an artifact repository manager that allows you to store, manage, and retrieve artifacts and dependencies for your projects. It supports various formats, including Maven, npm, Docker, and more. By using Nexus, development teams can ensure that they have a centralized and reliable source of artifacts, which enhances collaboration and consistency across projects.
Key Features of Nexus
1. Centralized Repository Management: Nexus provides a central location to store and manage all your project artifacts. This centralization helps in maintaining version consistency and reducing duplication.
2. Support for Multiple Formats: Nexus supports a wide range of artifact formats, including Maven, npm, Docker, NuGet, and more. This flexibility makes it suitable for diverse development environments.
3. Proxy Remote Repositories: Nexus can proxy remote repositories, caching artifacts locally to improve build performance and reliability. This feature reduces the need to repeatedly download dependencies from external sources.
4. Security and Access Control: Nexus offers robust security features, including role-based access control, SSL support, and integration with LDAP. These features help ensure that only authorized users can access and modify artifacts.
5. Integration with CI/CD Pipelines: Nexus integrates seamlessly with Continuous Integration and Continuous Deployment (CI/CD) tools, such as Jenkins, to automate the build and release process.
Getting Started with Nexus
1. Installing Nexus:
- Download the Nexus Repository Manager from the official site.
- Follow the installation instructions for your operating system. Nexus can be installed on various platforms, including Windows, macOS, and Linux.
2. Setting Up Nexus:
- After installation, start Nexus and access the web interface by navigating to
http://localhost:8081in your web browser. - Log in with the default credentials (
admin/admin123) and change the password for security purposes.
3. Configuring Repositories:
- Create hosted repositories for storing your internal artifacts.
- Set up proxy repositories to cache artifacts from external repositories, such as Maven Central or npm Registry.
- Create group repositories to aggregate multiple repositories into a single endpoint.
Example: Creating a Maven Hosted Repository
- Navigate to the “Repositories” section in the Nexus web interface.
- Click on “Create repository” and select “maven2 (hosted)”.
- Configure the repository settings, such as name, version policy, and storage location.
- Save the repository.
Using Nexus in Your Projects
1. Configuring Maven to Use Nexus: Update your project’s pom.xml file to include the Nexus repository:
xmlCopy code<repositories>
    <repository>
        <id>nexus</id>
        <url>http://localhost:8081/repository/maven-releases/</url>
    </repository>
</repositories>

<distributionManagement>
    <repository>
        <id>nexus-releases</id>
        <url>http://localhost:8081/repository/maven-releases/</url>
    </repository>
    <snapshotRepository>
        <id>nexus-snapshots</id>
        <url>http://localhost:8081/repository/maven-snapshots/</url>
    </snapshotRepository>
</distributionManagement>
2. Deploying Artifacts to Nexus: Use the Maven deploy plugin to upload artifacts to Nexus:
shCopy codemvn deploy
Ensure that your settings.xml file is configured with the correct server credentials:
xmlCopy code<servers>
    <server>
        <id>nexus-releases</id>
        <username>admin</username>
        <password>admin123</password>
    </server>
    <server>
        <id>nexus-snapshots</id>
        <username>admin</username>
        <password>admin123</password>
    </server>
</servers>
Best Practices for Using Nexus
1. Regularly Clean Up Repositories: Implement cleanup policies to remove outdated or unused artifacts, freeing up storage space and improving repository performance.
2. Secure Your Nexus Instance:
- Use strong passwords and change default credentials.
- Enable SSL to encrypt data in transit.
- Configure role-based access control to limit user permissions.
3. Monitor Repository Health: Regularly monitor repository health using the built-in tools and reports provided by Nexus. This helps in identifying and resolving issues early.
4. Backup and Recovery: Implement a backup strategy to ensure that you can recover your repository data in case of failure or data loss.
Conclusion
Nexus Repository Manager is an essential tool for managing artifacts and dependencies in modern software development. By centralizing your artifacts, supporting multiple formats, and integrating with CI/CD pipelines, Nexus enhances the efficiency and reliability of your development process. Implementing the best practices outlined in this guide will help you maximize the benefits of using Nexus in your projects.